

Most homeowners flip on a ceiling fan to stay cool and never think twice about it. But if your ceiling fan is spinning in the wrong direction, it isn’t saving you anything. In fact, the wrong ceiling fan direction can make your HVAC system work harder than it needs to, in both summer and winter.
The good news: changing ceiling fan directions takes about ten seconds. A small switch, a tap on one of the remote controls, or a setting in an app is all it takes. Done right, it can lower your energy bill and keep every room more comfortable year-round.
Here’s exactly how to set it, why it works, and what to watch for along the way.
Why Ceiling Fan Direction Matters for Your Home
A ceiling fan doesn’t cool or heat the air. What it does is move air, and the blade direction makes a big difference in comfort and energy efficiency.
Most ceiling fans can spin in two directions when viewed from below:
- Counterclockwise: Ceiling fan blades push cooler air straight down toward the floor.
- Clockwise: Ceiling fan blades pull air upward, pushing warm air down along the walls.
Each ceiling fan direction is built for a different season. The wrong blade direction means the ceiling fan is working against your comfort.
According to the U.S. Department of Energy, the right ceiling fan direction can let you raise your thermostat by about 4°F in summer with no drop in comfort. And in winter, circulating air redistributes heat trapped near the ceiling.
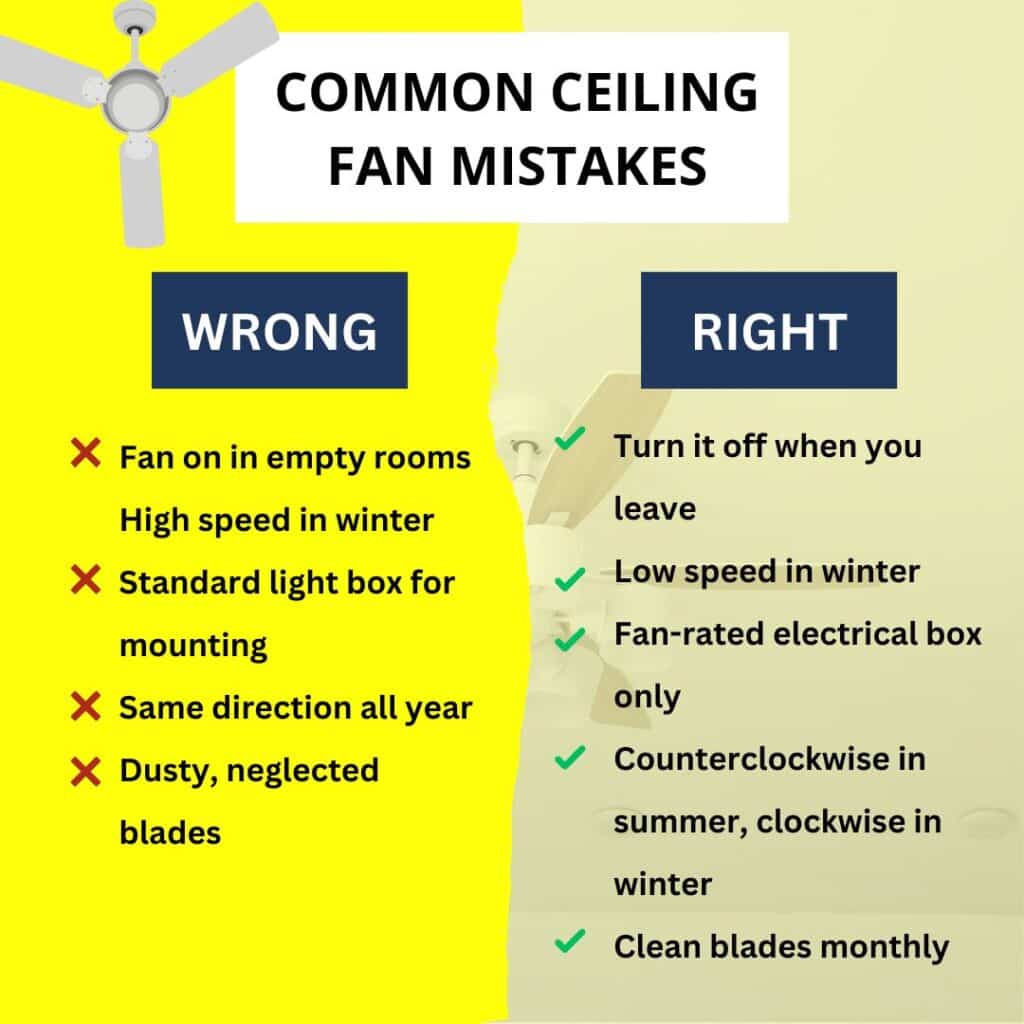
For optimal energy savings, ceiling fans should only operate in occupied rooms. A ceiling fan cools people through airflow, not the air itself, so running one in an empty room wastes energy with no benefit.

Summer: Set Your Ceiling Fan to Turn Counterclockwise
When warm weather arrives across the Chicago suburbs, set your ceiling fan to spin counterclockwise. Looking up at the ceiling fan, the blades should move from right to left, the opposite of a clock.
At medium to high speed, angled blades push air straight down. This downward airflow creates the wind chill effect.
The counterclockwise direction causes moving air to hit your skin, speed up evaporation of moisture, and make the room feel cooler even though the air temperature hasn’t changed. That’s what lets you turn up the air conditioning a few degrees and still stay cool.
How to confirm summer mode: Stand directly under the ceiling fan at medium or high speed. If you feel a cooling breeze, the ceiling fan is set correctly. If you feel almost nothing, the fan spin direction needs to be reversed.
A useful cue: use Daylight Saving Time as your seasonal reminder. When you spring forward, change your ceiling fan direction to counterclockwise.
When clocks fall back, switch to clockwise. It lines up naturally with when you need each setting most.
| Setting | Correct for Summer |
|---|---|
| Direction | Counterclockwise (blades move right to left from below) |
| Speed | Medium to high |
| What to feel | A noticeable cooling breeze |
| Thermostat benefit | Raise up to 4°F comfortably |
Winter: Set Your Ceiling Fan to Rotate Clockwise
Here’s where a lot of homeowners leave savings on the table.
When temperatures drop, and they drop hard in Batavia and across the western suburbs, most people turn the ceiling fan off entirely. But the right ceiling fan direction in winter can actually reduce heating costs.
In winter mode, change the direction so the ceiling fan blades rotate clockwise when viewed from below, and set the fan’s speed to low. This clockwise direction creates a gentle updraft that pulls cooler air from floor level upward.
As it does, the warm air that naturally rises and collects near the ceiling gets pushed back down along the walls and into the living space, without a draft you’d feel on your skin. The room warmer feels that this means the heating system runs less often.
The effect is even more pronounced in rooms with high ceilings. If you have a vaulted great room, open stairwell, or cathedral ceiling (common in a lot of homes across Batavia and into Naperville), warm air stratification is a real issue in winter seasons.
Spinning clockwise at low speed helps the ceiling fan distribute that warmth more evenly and helps reduce heating costs without touching the thermostat.
Running the ceiling fan at high speed in winter is a common mistake. It creates a wind chill effect you don’t want and works against the whole purpose of winter mode.
Winter Ceiling Fan Settings at a Glance
| Setting | Correct for Winter |
|---|---|
| Direction | Clockwise (blades move left to right from below) |
| Speed | Low |
| What to feel | No direct draft; more even warmth |
| Heating benefit | Reduces warm air stratification; heating system runs less |
How to Change Ceiling Fan Direction
Most ceiling fans offer one of three ways to change the direction:
- Toggle switch on the motor housing: The most common method. Turn the ceiling fan off and wait for the ceiling fan blades to come to a complete stop.
- Reach the motor housing and look for a small ceiling fan direction switch: usually a slider or toggle. Flip it, then turn the ceiling fan back on to confirm the correct fan direction.
- Handheld remote controls or wall control: Many modern ceiling fans come with remote controls that let you change the ceiling fan’s direction without a ladder. Check for a reverse or direction button. The fan’s speed can often be adjusted from the same remote.
- Smart ceiling fans: Smart ceiling fans can be controlled via smartphones, tablets, or voice-activated assistants like Amazon Alexa or Google Assistant.
Many smart ceiling fans also include scheduling features and allow for adjusting the fan’s speed remotely, making it easy to change the ceiling fan direction seasonally without any extra effort. Smart ceiling fans are increasingly common in newer and remodeled homes throughout the Chicago area.
Important: Always wait for the ceiling fan to reach a complete stop before switching blade direction. Changing the direction while the blades are still spinning can damage the motor.
Room-by-Room Ceiling Fan Direction Tips
The right ceiling fan direction isn’t always the same in every room. A few situations worth knowing:
High ceilings and vaulted spaces: In rooms where the ceiling fan is mounted significantly higher than normal, run it counterclockwise year-round as a ceiling fan year-round setting. At that height, the wind chill effect in winter is minimal, and the air circulation benefit outweighs the seasonal flip.
- Low ceilings: With low ceilings, keep the ceiling fan spinning clockwise at low speed so you don’t feel an unwanted breeze in cooler months.
- Dining room: Set the ceiling fan to low speed in the clockwise direction so downward airflow doesn’t blow across the table or cool food too quickly.
- Bedrooms: Turn counterclockwise in summer for a cooling breeze while you sleep. Switch to low clockwise in winter to keep the room warmer without a draft.
Covered outdoor spaces: For a covered porch or patio (great for spring and fall evenings here in Illinois), counterclockwise works well to keep air moving and deter insects. Make sure any outdoor ceiling fan model is rated for damp locations.
Ceiling Fan Installation and Maintenance Basics
If you’re installing a new ceiling fan or evaluating an existing fan model, a few specs matter for both safety and performance.
- Height and clearance: A ceiling fan should be installed at least 7 feet above the floor, with ceiling fan blades positioned at least 18 inches from walls for optimal airflow and performance.
- Blade pitch: Ensure blade pitch is between 12 and 16 degrees. Angled blades with too little pitch won’t move enough air regardless of the fan’s speed or direction.
- Electrical box: The mounting bracket must be secured to a UL-listed, fan-rated electrical box. Standard light fixture boxes aren’t designed to support a ceiling fan’s weight and movement: one of the most common installation errors found during home inspections.
- Wiring: When wiring a ceiling fan, connect the black wire to the black, the white wires to the white, and the green wire to ground. If you’re not comfortable with electrical work, this step is worth handing to a licensed electrician.
Routine maintenance tip: Perform routine checks to make sure all screws and bolts are tight and that ceiling fan blades are clean and free of dust buildup.
Dust buildup reduces the ceiling fan’s performance and forces the motor to work harder. A quick wipe of the fan blades every month or so keeps air circulation strong and energy savings consistent.
What Ceiling Fan Issues Can Signal About Your Home
Ceiling fans are small, but sometimes what happens with a ceiling fan points to something bigger.
- Wobbling or unstable mounting: A ceiling fan mounted to a standard electrical box rather than a fan-rated box is a common finding in home inspections. It’s a safety issue that’s easy to miss without a trained eye.
- Buzzing or flickering: Can point to a dimmer switch not rated for ceiling fans, a loose connection, or an underlying wiring issue. Electrical concerns are among the most frequently flagged items across home inspections in the Chicago area.
- Infrared inspections: For issues that aren’t visible, like a hot spot in wiring near a ceiling fan installation, an infrared inspection uses thermal imaging to detect temperature variations that a standard visual inspection would miss entirely.
Other Related Questions
Does circulating air affect how hard my HVAC system has to work? Yes. Ceiling fans don’t change air temperature; they change how efficiently your HVAC system distributes it. Better air circulation means the heating system and air conditioning unit run less often, and that shows up on your energy bill across the summer and winter seasons.
What home systems are most commonly flagged during a home inspection? Electrical systems, plumbing, roofing, and HVAC are among the most frequently flagged areas. Electrical concerns, including improper wiring, overloaded circuits, and non-fan-rated ceiling boxes, come up regularly in older homes across the Chicago suburbs.
What can an infrared inspection reveal that a standard inspection can’t? An infrared inspection detects heat variations not visible to the naked eye, including electrical hot spots, hidden moisture intrusion, insulation gaps, and energy loss points. For homeowners with unexplained energy costs, it’s one of the most valuable ancillary inspection tools available.
What’s the difference between a standard and a healthy home inspection? A standard home inspection covers the structure, systems, and major components of a property. A healthy home inspection goes further, assessing indoor air quality and the presence of hazards like mold, radon, lead, or asbestos. It’s an important additional layer for families or homes with older construction.
When to Call a Professional
Most ceiling fan direction changes are simple DIY adjustments. But call a professional when:
- The ceiling fan wobbles significantly, or the ceiling mount feels unstable.
- You notice buzzing, flickering lights, or tripped breakers tied to the ceiling fan.
- The ceiling fan doesn’t respond to the ceiling fan switch or remote controls, despite the power being on.
- You’re installing a new ceiling fan and aren’t sure the existing box is fan-rated.
- You’re buying or selling a home and want a full evaluation of the electrical system, including all ceiling fan installations.
Conclusion
Getting ceiling fan directions right is one of the easiest wins in home efficiency.
Turn counterclockwise in summer, rotate clockwise in winter, and do a quick check each time you change the ceiling fan direction seasonally. That’s it.
It costs nothing to change the direction, and done consistently, it takes real pressure off your air conditioning and heating system, keeping your home more comfortable whether it’s a humid July in Batavia or a cold February with wind chill rolling in off the Fox River.
If you’re buying or selling a home and want everything from electrical systems to ceiling fan installations properly evaluated, P.I. Home Inspection Services serves Batavia, Chicago, and communities throughout the surrounding suburbs with thorough, honest inspections you can count on.
Ready to schedule? Contact P.I. Home Inspection Services today.